

Transforming Our 1995 Chevy G20
- Alex Casias

- Oct 12, 2019
- 6 min read
Updated: Oct 20, 2025

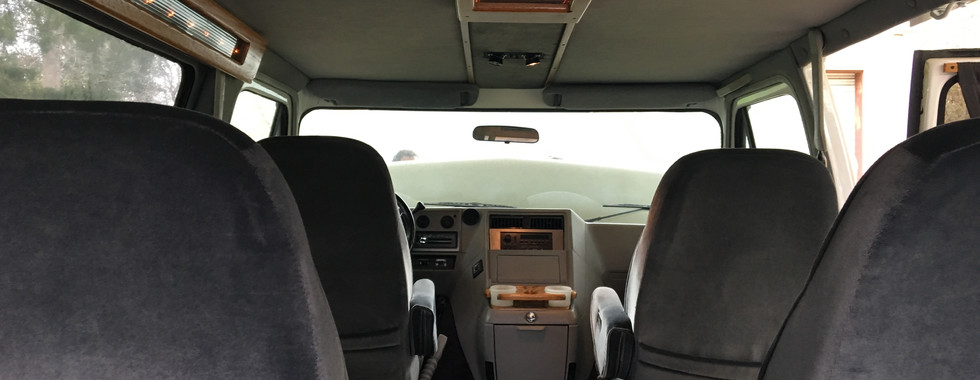
In the spring of 2017, Nikki and I bought a van. It's a 1995 Chevy G20 that we found on craigslist for $3,000. It had 55,000 miles on it and the blue interior was in mint condition. I remember showing her the post and before I could ask, she had scheduled an appointment with the owner. We knew immediately that it was the right one so we claimed it as our own. There where a few creeper van jokes here and there (you know who you are) but no one could argue that the inside was top notch. It had 4 big blue captain's chairs and a bench seat in the back that folded down into a bed; not a big one, but still a bed.
(Here are some photos from the very first time we saw the van at the owner's house)


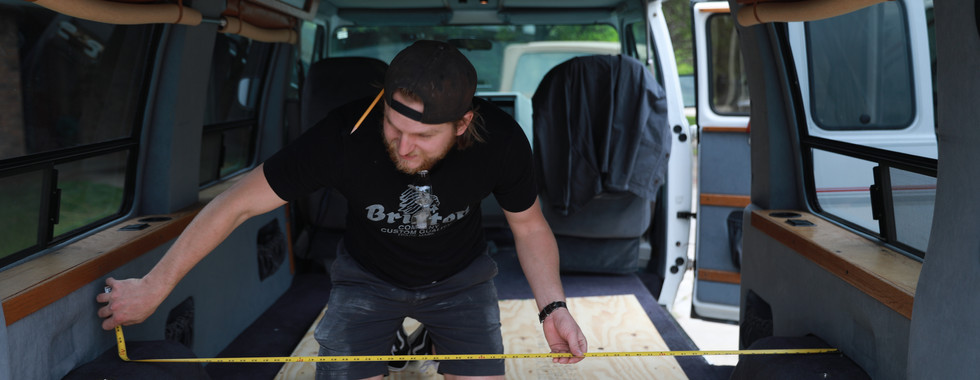
When the conversion process started we knew it was going to be a bit tricky, because we didn’t want to gut the whole thing and start from scratch. The van was in such good shape that it almost felt wrong to rip out the perfectly good interior. So we planned to build around the original base. <use arrows to see photos>


Like any big project, it took some time and a bit of momentum to get started. The idea of transforming an entire vehicle into something that could be livable on the road, even if it was for a short time, was incredibly intimidating. We've always had the dream of packing up everything we owned and traveling across the states but we didn't know how difficult it would be to get up to that point. It took months of saving, planning and building to make this thing happen. I know the van doesn't necessarily need all of the things we added, but over time it slowly became a symbol of growth for Nikki and I. The nicer the van got, the more confidence we had to justify our dreams of actually living in it.

It all started with taking out the bucket seats and back bench. We realized on our honeymoon that the number one priority of the renovation was having a comfortable place to sleep. So we prioritized our space to have a queen sized bed. This was a luxury for us because we slept on a full size bed for almost 3 years (and I'm not going back). We were okay with sacrificing a little bit of extra living space for a bed where our feet didn’t hang off. <use arrows to see photos>


The second thing we addressed was the storage problem. I specifically remember being in an rv park near Yosemite during our honeymoon and I opened the back doors to a mountain of dirty clothes that we had ignored for too long. Everything fell into the dirt and we spent half an hour trying to make it all fit, but inevitably it happened over and over again. We decided to raise the bed and install a hatch door for our clothes and important things like camera gear and laptops. We call this our closet. <use arrows to see photos>


Once the floor plan was locked in, we decided to add a water proof vinyl flooring. We wanted to finish the bed first so that the wood could settle into the carpet making it more secure and silent; plus the carpet underneath the flooring acted as a form of insulation. This not only added a new and improved look, it also makes it easier to clean when we track in mud and sand.

Next on the list, was to make a small kitchen area for our food, cookware, and refrigeration. We were limited with this space because the only place it could go was on the driver side behind the front seat. After many hours of research, we saw that most people living in a van noted that an efficient thermoelectric cooler was a necessity to making this lifestyle work. It had to be small enough to fit in our space, but big enough for two people to use. So we found one on amazon that wasn't quite in our price range but we went ahead and bit the bullet. Once the cooler arrived we were able to build a good sized cabinet around it. This included a nook for dry storage, a drawer for junk, and a countertop for things like paper towels and a water jug. <use arrows to see photos>


At this point, the van was starting to feel more like a home, but it was still missing something. We started looking at different van concepts online and found something they all had in common. No windows. It gave the vehicle a little bit more of a “cozy” vibe. But because we wanted to preserve the original interior, we had to get a little bit more creative. So we added some faux leather roll up shades and a few tan curtains that my mom made with LOVE (twice, because we are picky). She also sewed in magnets to the sides of the curtains that seal the light out, an absolute necessity in those bright ass Walmart parking lots. This allowed us to have the best of both worlds. Privacy at night and a wide open view during the day.
<use arrows to see photos>


We also added a wooden wall above the kitchen counter for some homey things like a spice rack and a few screws to hold our cooking utensils. Nikki convinced me it was necessary to add a couple of decorative pieces; The mirror is my favorite. (It's been "fun" only being able to see a third of your face at a time.)
<use arrows to see photos (I'm getting sick of having to remind you)>


Just like a real house, we also added a garage. This area is only accessible from the back doors of the van. We call it the garage because it houses all the crap we can’t fit in our closet. Things like our camping chairs, folding table, tool box and firewood fit nice and neat under the back section of the bed. I added a rubber vinyl on the garage floor to protect from dirt and mud that many campgrounds so graciously offer.


The last thing we did was add a power source. We installed a deep cycle RV battery underneath the bed that is connected to a 700 watt inverter. This allows us to convert dc power to ac. (Which means we can run things like the cooler and lights without relying on the van's battery). We looked into solar panels for recharging purposes but it was a bit more expensive than we expected, so we simply hardwired the auxiliary battery to the vehicle's battery itself. Doing this allows the alternator to recharge both power sources while the van is running; which turns out to be PLENTY.

Jim (Nikki's dad) recommended getting a “battery isolator” for the van as well. It separates the van's battery from the auxiliary battery which stops our electronics from draining it down once the auxiliary battery is dead. It also acts as a dual battery controller giving us the option to override the current and start the van from the auxiliary battery, if it came down to it. So far the set up has been more than enough to charge our phones, computers, and dvd player for the occasional movie night (currently watching the Bourne series and feeling like we could kick someones ass because of it).
Overall, the renovation process was fairly simple. Nothing too fancy to take away from the experience. We chose this lifestyle because we wanted to learn to make do with what we have, not what we want, although a dishwasher would be nice. I think we're realizing now that living in our van and traveling across the country was only part of the dream. The idea of saying we're going to do something and then doing it, is much more powerful. I'd like to think we are truly starting to grow into who we are as people and this is a significant step into that phase of our lives.
<use arrows to see photos>


Last notes: I just want to make it clear- we have no carpentry experience, we had no clue what a battery isolator was and we had no idea what we would have to learn to make this happen. My point is, we DID learn. It's not perfect and I am sure things would be different if we did it again, but we built this with our own hands with more intention than we've done anything before.
This couldn't have happened without the help and support from our families! We can't thank them enough for their countless hours of help in the garage and their encouragement to pursue something crazy.


WOW, this van is a masterpiece! Standing ovation! (Was scared I wrote ovulation lol).